
If you are using the Raid2Earn bot: This is the correct documentation: https://raid2earn.site/whitelist-bot-documentation/
Activating the license key with /activate [key]
To activate the license key enter the application command /activate [key] (replaced with the actual key). It should state the license has been activated succesfully.
Setting up the Server with /start
Invite the bot using this URL: Invite
First of all, you need to be added to the license list. For this, you need to contact me over Discord, Email, or Twitter. You will find a link to the website using /help
After your server is added to the license list you can execute the /start command there will be the following parameters
Required:
minimum-balance – This is the minimum amount of ETH a user must have to submit or change their wallet. If you do not want them to have a specific amount just enter „0“.
whitelist-role – This role can submit, change and verify their submissions and will be added to the whitelist table.
bot-admin-role – This role can execute the /start , /export & /exportreserve command. Only give this command to very trustworthy individuals from your team.
whitelist-channel – In this channel, the people can execute the bot commands. It is good to add information in this channel on how to use the bot.
Optional:
reward-role – This role will be given to people after they successfully submit their wallet. This is optional but can be good so that people can see it even easier than they submitted successfully.
reservelist-role – This role can submit, change and verify their submissions and will be added to the reservelist table. Only add this if you want to use a reservelist.
og-role – This role can submit, change and verify their submissions and will be added to the og table. Only add this if you want to use a OG list.
og-custom-name – With this optional feature you can set a custom name for the „OG list“ role (standard name). Only add this if you want to change the name of the „OG“ list.
whitelist-custom-name -With this optional feature you can set a custom name for the „Whitelist“ role (standard name). Only add this if you want to change the name of the „Whitelist“.
reserve-custom-name – With this optional feature you can set a custom name for the „Reservelist“ role (standard name). Only add this if you want to change the name of the „Reservelist“.
At the first execution of this command, the Database will be set up. After that, you can execute this command as often as you want and change the config.
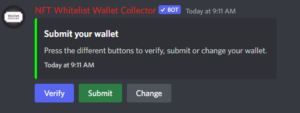
Creating a verify button with /buttoncreate
By using the /buttoncreate you will create a button the looks like the following picture. In ordner to use this make sure you already setup the server with /start and execute the /buttoncreate coammand in the defined wallet submission channel. The user output will remain the same.
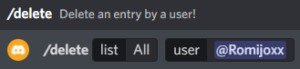
Deleting a user entry /delete [table] [user]
With this command you can delete a database entry of a specific user. First you have to choose from which list you want to delete the user entry. The 3 standard tables are optionally available (these names will always be displayed the same no matter how you choose the custom names). An ‚All‘ feature is also available if you wish to delete them from all tables. Then select the user from whom you want to delete the entry.
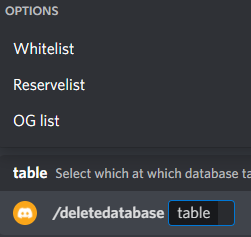
Deleting all entries of a database /deletedatabase [table]
With this command you can delete all entries of a specific database table. The 3 standard tables are optionally available (these names will always be displayed the same no matter how you choose the custom names). Be careful with this command as you will delete all entries of the specific list you select.
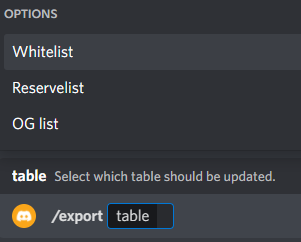
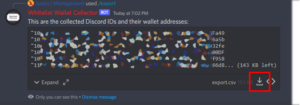
Exporting the data with /export [table]
Using the /export [table] command will prepare a CSV with user Discord IDs and ETH Addresses which can be downloaded.
The 3 standard tables are available as options (these names are always displayed the same no matter how you choose the custom names).
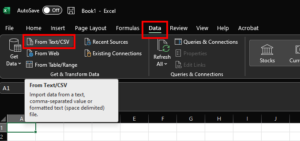
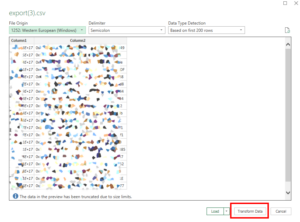
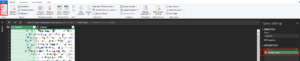
For most cases, you need to split the columns of user Discord ID and ETH Address. This can be done by following these simple steps in excel:
For more information about excel: https://support.microsoft.com
- Download the CSV from Discord
2. Open Excel, navigate to the „Data“ Tab and select „From Text/CSV“
3. Open the downloaded file
4. Click on transform Data because the user IDs are displayed wrong in Excel by default
5. Remove the „Changed Type“ after that click on „Close & Load“ and you are finished
Are you looking for the user documentation? https://whitelistbot.de/discord-wallet-collection-bot-minimum-balance-check-user-documentation/
Submit your wallet /submit [Wallet-Address]
Using the /submit [wallet-address] will submit your wallet address to the whitelist.
Verify your submitted wallet /verify
With /verify you can check which wallet you have submitted to the whitelist